The Designerator Image Processing Framework is part of the
Designerator Project. You find source code and downloads at
code.google.com/p/designerator/. You also will find a copy of this tutorial at the
designerator tutorials page, where the code is hopefully better formated. The intent of this project is to provide an easy and fun way into Image processing for the developer and an easy and fast way for the user to edit his images on the fly, without the hassle of using a heavy weight image editor like
Photoshop. The major features are:
- The ImageCanvas - which I have put into an Eclipse Editor and a View
- Built in multithreaded image processing with support of convolution kernels
- Access to the screen image for optimum speed
- The option of lossless image editing with XML edit data storage
- Quick and Easy creation of Controls for the image processing filters
- Simple testing with the Image Developer Application
- Support for Tools
- Plugin Templates for a fast start and integration to the Editor
There is the prejudice that Java is too slow for professional image processing. That is not true. At best
C/C++ is 5% faster, which is not recognizable. With a modern 4-core cpu Designerator Image Processing handles 20 MP images with ease. It is true though, that much faster code can be written using
SIMD, which also can be accessed from Java via JNI. Let's get started by creating a new Eclipse plugin for the Designerator Image Editor.
Go to Help - Install new Software - and add the Designerator Update Site to install the Image Processing Framework and
restart Eclipse.
Go to File - New - Plugin Project to start the PDE plugin wizard.
In Template page choose Designerator Image Filter.
The Filter Plugin Template is pretty straight forward. As usual
choose a class name and a
package name. The Filter name should be presentable but short. Then you can
choose from various filter templates. I choose
the Empty Template, which has some basic functionalitiy. You also can choose from
two menus to put your Plugin, which is either 'edit' or 'plugin'.
The
Empty Template is the most simple and a good option to start. The template will add all required plugin dependencies. If you don't use the template wizard the minimum dependencies required are:
- org.eclipse.ui
- org.eclipse.core.runtime
- org.designerator.common
- org.designerator.media.image
!Important! - To use the Designerator ImageDeveloper Application you also need this dependency:
- org.designerator.media.image.developer
After opening the new Class in the JDT Editor you can already run the Filter in the Image Developer application.
Open the Context Menu - Run As - Designerator ImageDeveloper.
The Empty Filter Template is not doing much. It just increases the RGB values and brightens the image.
As you can see there is some special functionality for developing image procssing algorithms, which are quite self explanatory. Important is the Option 'Toggle Screen and full ImageData', which I will be explaining in detail.
Options are:
- Set the number of threads
- Use screen ImageData or full ImageData
- Use delayed processing on/off
- Run the Filter in a Dialog
- Set a pixel point to observe color value changes
- Record the runtime of the algorithm
- Print the changes of the pixels to the screen
The Code
To run an IProcessor the code would typically look like this:
IProcessor processor = new MyProcessor();
processor.init(IImageEditor editor, boolean previewData, boolean deleteCache);
if (processor.updatePixels(ProcessorData[] params)) {
processor.process();
}
As with your Template I strongly recommend to start an IProcessor by
subclassing the abstract class Processor.
Let's walk through the code. The Constructor is usually empty.
@Override
public void init(IImageEditor editor, boolean previewData, boolean deleteCache) {
if (editor == null) {
return;
}
this.editor = editor;
iData = editor.getImageData(previewData, deleteCache);
dest = new byte[iData.data.length];
setTimer(true);
super.init(editor, previewData, deleteCache);
}
IImageEditor is the link to the ImageCanvas. Important methods are:
- editor.getImageData((boolean) previewData, (boolean)deleteCache)
- editor.processFinnished((ImageData) result, (boolean) previewData);// The Super Class Processor will call this for you
- editor.getDisplay()
Most important is the usage of the boolean previewData. When perviewData is true, it means that you ask for the ImageData of the Screen Image, which can be much smaller than the original ImageData. Of course any image filter will run much faster using the Screen ImageData for the preview. In the usual case of a Dialog interface, we use the screen preview imageData first and only after the user pressed the OK Button, we process the original ImageData.getCurrentProcessorData
:
@Override
public ProcessorData[] getCurrentProcessorData() {

ProcessorData[] params = new ProcessorData[1];
ProcessorData pd = new ProcessorData();

pd.name = AMOUNT; // name of the parameter
pd.selection = (int) (amount * 100f + 0.5); // current selection
//pd.data  store selections array
pd.index = 0;
pd.max = 100; // maximum of the Scale
pd.min = 0; // minimum of the Scale - can be negative
pd.increment = 100; // scale increment
pd.delay = true; // the Scale only fires when the user pauses the movement
params[0] = pd;

return params;
}
The class ProcessorData is used for 3 tasks:
- to store and pass the selection of a parameter of your algorithm
- to save the edit data using XStream in case of lossless editing
- to quickly create a special Widget Scale for interaction to modify the parameters of the algorithm
You can create as many
ProcessorData as you need and create as many Scales or return null to ignore.
@Override
public void createControl(Composite parent,
final IProcessListener messageListener,
int[] lastSelection) {
super.createControl(parent, messageListener, lastSelection);
createAdditionalControl(parent);
}
Only if you want to add custom Controls you need to override this method. Otherwise
getCurrentProcessorData() does the Job.
@Override
public boolean updatePixels(ProcessorData[] params) {
if (isRunning() || params == null) {
return false;
}

for (ProcessorData param : params) {

if (param.name.equals(AMOUNT)) {
amount = param.selection * 0.01f;
}
}

return true;
}
This method is called before "process". You get your updated params and need to call any neccesary preparations before the "process" is called.
public void processDefault(IProgressMonitor monitor, boolean preview) {
super.processDefault(monitor, preview);

if (!preview) {
init(editor, false, false);
}
if (getMonitor() != null) {
getMonitor().beginTask(getName(), getOrignalImageData().height);
}
process();
}
This method is called from the Gui Thread either at the beginning of a Session - the Dialog has just opened - or at the End - the
User has pressed the OK Button. The call to super wraps the
IProgressMonitor into an AsyncMonitor and should only be accessed by 'super.getMonitor()'. The boolean 'preview' is again of the utmost importance. As mentioned there are two ways to process the image. When 'preview==false', which means to use the full ImageData, you need to retrieve the full ImageData and discard the Screen ImageData. Best this is done by calling init with the right parameters again.
public void run(SegmentImageData data) {
runEmpty(data, dest, amount, getMonitor());
}
This method is already called from the processing thread. So when there are four Threads for four cpu's, it will be called 4 times. It passes a SegmentImageData, that is the segmented ImageData for this Thread. I will go into detail, when we look at the actual implementation of the run method, which I ususally put into a static method to optimize performance and easy chaining of the algorithms.
This is where the action happens.
public static boolean runEmpty(SegmentImageData segment,
final byte[] dest,float amount,
IProgressMonitor monitor)
The prameters are:
- SegmentImageData
- byte[] dest - this where we store the result
- amount - parameter for the algorithm
- IProgressMonitor will be null most of the time - unless 'processDefault' was called at the end of a session.
SegmentImageData explained: This part of the code generally always stays the same when you do single pixel processing. When you run a Convolution, which also is supported, there are minor changes.
final int step = segment.bpp;
int scanLineEnd = segment.start + segment.scanLineLength - step;
final byte[] source = segment.data;
final int rs = segment.redShift;
final int gs = segment.greenShift;
final int bs = segment.blueShift;
final int length = segment.length - segment.pad;
segment.bpp : bytes per pixel - will always be 3 or 4 (RGB,GBR,RGBA,GBRA)
segment.pad: the padding of a scanline are extra bytes added so that every scanline is divisable by four
segment.data: is the orignal ImageData.data byte[] array
segment.redshift,greenshift,blueshift: either 0,1,2,3. The position of the red, green or blue byte
segment.length: the length of the byte[] segment
The Loop: you
only need three lines of code to change the pixels. For single pixel processing everything stays the same and can be copied at will.
for (int i = sourceData.start; i < length; i += step) {

b = source[i + bs] & 0xff;
g = source[i + gs] & 0xff;
r = source[i + rs] & 0xff;

// This is where pixels are altered
b = clamp((int) (b+((255-b)*amount)));
g = clamp((int) (g+((255-g)*amount)));
r= clamp((int) (r+((255-r)*amount)));
// end of changing pixels

dest[i + bs] = (byte) b;
dest[i + gs] = (byte) g;
dest[i + rs] = (byte) r;

if (i == scanLineEnd) {

scanLineEnd += sourceData.scanLineLength + sourceData.pad;

if (sourceData.pad != 0) {
i += sourceData.pad;
}

if (monitor != null) {
// maybe it will be better to call the monitor less often?
monitor.worked(1);
}
}
}
@Override
public void dispose() {
super.dispose();
src = null;
dest = null;
iData = null;
}

@Override
public String getName() {
return Name;
}

public ImageData getOrignalImageData() {
return iData;
}

@Override
public byte[] getResult() {
return dest;
}
You need to implement these methods.
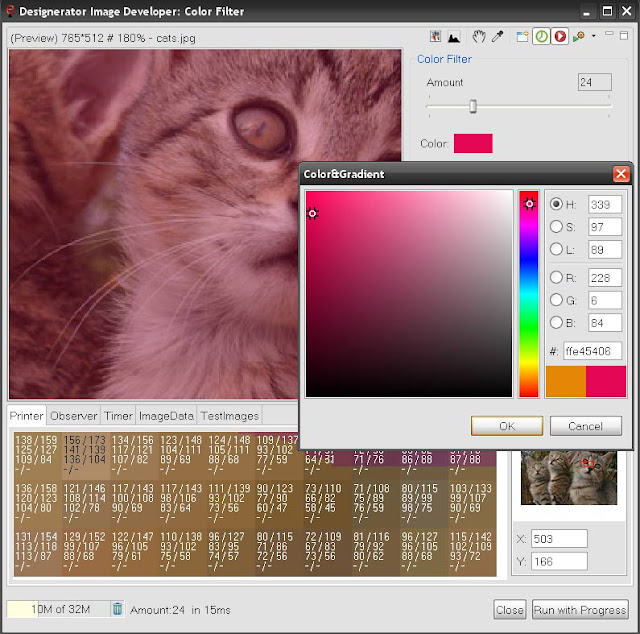
Code a Colorize Filter
Let's use the EmptyFilter Template to write a Colorize Filter in very view steps. The Colorize Filter will shift the Color of the image to a specified color. e.g. to give it a warmer touch.
Change the Name:
public static final String Name = "Color Filter";
Add a Field for the Color:
private RGB rgb = new RGB(228,134,6);
Change the run() method name and parameters - add the RGB:
public static boolean runMixer(SegmentImageData sourceData,
final byte[] dest,
float amount,
int red, int green,int blue,
IProgressMonitor monitor) {
Change the Loop:
dest[i + bs] = (byte) clamp((int) (b+(((blue-b)/2)*amount)));
dest[i + gs] = (byte) clamp((int) (g+(((green-g)/2)*amount)));
dest[i + rs] = (byte) clamp((int) (r+(((red-r)/2)*amount)));
That is it. We only have a fixed Color, but we can already try out our new Filter.
This algorithm runs automatically multithreaded.
By default it will set the number of threads to the number of available cpu's.
Open the Context Menu -
Run As - Designerator ImageDeveloper
.
public void createControl(Composite parent,
final IProcessListener messageListener,
int []lastSelection) {

super.createControl(parent, messageListener, lastSelection);
createColorChooser(parent);
setColor(rgb,false);
}

protected void createColorChooser(Composite parent) {
Composite composite = new Composite(parent, SWT.NONE);
composite.setLayoutData(new GridData(SWT.FILL, SWT.BEGINNING, true, false));
composite.setLayout(new GridLayout(2, false));

Label label = new Label(composite, SWT.NONE);
label.setLayoutData(new GridData(SWT.BEGINNING, SWT.CENTER, false, false));
label.setText("Color:");

colorLabel = new Label(composite, SWT.NONE);
colorLabel.setLayoutData(new GridData(48, 24));
final IRGBUpdateable updater = new IRGBUpdateable() {

@Override
public void update(RGB rgb) {
setColor(rgb,true);
}
};
colorLabel.addMouseListener(new MouseAdapter() {

@Override
public void mouseDown(MouseEvent e) {
RGB old = rgb;
HSBColorDialog colorDialog = new HSBColorDialog
(colorLabel.getShell(), true, updater);
colorDialog.setColor(colorLabel.getShell().getDisplay(), rgb);
colorDialog.setAddButton(false);
int code = colorDialog.open();
if (code == Window.OK) {
setColor(colorDialog.getPreviewColor(),true);
}else {
setColor(old,true);
}
}

});
}

protected void setColor(final RGB rgb, boolean process) {

final Color color = new Color(colorLabel.getDisplay(),rgb);
Color tmp = this.color;
this.color=color;
colorLabel.setBackground(color);
if (tmp!=null) {
tmp.dispose();
}
if (this.rgb.equals(rgb)) {
return;
}
this.rgb=rgb;
if (process) {
if (!isRunning()) {
process();
}
}
}

@Override
public void dispose() {
super.dispose();
dest = null;
iData = null;
if (color!=null) {
color.dispose();
}
}
- I have created a Label to display the choosen Color
- I have added the org.designerator.color.dialog.HSBColorDialog as the ColorDialog (also added plugin dependency)
- I have added an IRGBUpdateable to the HSBColorDialog to provide direct feedback
- I have added the method setColor() to handle the change of the choosen Color
- I changed the dispose method to dipose the Color
Lets see the result:
Colorizer.java
To add the Filter to the Image Editor and Image View, export the plugin and install it from the New Software Menu (choose local). After a restart the plugin will be added to the Editor.
Conclusion
I hope I was able to show how easy it is to create multithreaded image processing with Designerator and Eclipse/SWT. There still might be a quite few bugs and I have had only the time to test everything on the win32 platform. To get a better hold of things I recommend to go through the different Template examples. There you will find two Filters with Convolution Processing (Unsharp mask and SmartSharpen), which is a bit more complicated, but still easy enough.
Tutrials to come are:
- About the basics of image processing with SWT
- Designerator Image Processing outside the framework
- Convolution with SWT and Designerator
- Tools for Designerator ImageCanvas
- Use INTEL compiler intrinsics via JNI to access fast SEE instructions (SIMD)
Visit
designerator.org to try out Designerator Media Manager, or install the
Plugins for Eclipse.
All of Designerator code is open source under EPL.
The Designerator Eclipse Image Editor Plugin:


